Friday, June 9, 2023

Making Your Own Yogurt At Home


Yogurt, a simple food with ancient origins, has undergone countless transformations throughout history. It is a staple in the Middle East and Asia and is associated with health and longevity. Yogurt, which is considered to be one of the earliest fermented foods to have contributed to the development of human civilization, has been in existence for thousands of years.

Today, the average grocery store is filled with a plethora of yogurt options, each with its unique style and flavor. Despite all the varieties you can find at your local grocery store, yogurt remains a straightforward food that you can easily make at home. All that is required to make yogurt is milk, microbes, warmth, and time (or patience, as I like to say). When placed in the right conditions, yogurt will make itself, which is a testament to the simplicity and beauty of this nutritious food.

Interestingly, yogurt has many health benefits that are still being discovered today. Studies show that the beneficial bacteria found in yogurt can improve gut health, boost the immune system, and even prevent certain diseases.

When was the first yogurt made?

The exact date when yogurt was first made is not known, but it is believed to have originated in Central Asia or the Middle East more than 4,500 years ago. The ancient nomads who roamed the region discovered that milk carried in animal skins would occasionally ferment into a thick, tangy substance that could be eaten or drunk. They found that yogurt was easier to digest and more nutritious than milk, and it could also be stored for longer periods without spoiling.

Over time, the practice of making yogurt spread to other regions and cultures, and today it is enjoyed all over the world in various forms and flavors.

Milk and microbes, the winning combo

Milk, the base of yogurt, is an incredibly versatile and nutrient-rich liquid that is perfect for the development of a wide variety of microorganisms, including bacteria, yeasts, molds, and even viruses.

Although some of these microbes can cause illness, the vast majority of them are harmless and can even be beneficial. Understanding the role of microbes in milk is essential for producing safe dairy products, including yogurt.

One of the fascinating things about yogurt is the specific group of microbes that give it its unique flavor, aroma, and potential health benefits. These microbes are different from the ones typically used in cheesemaking because they thrive in warmer temperatures. Usually, yogurt cultures thrive at around 100 to 122 degrees Fahrenheit, whereas most cheese cultures grow at around 80 to 90 degrees.

The two most important bacteria used in yogurt production are Streptococcus thermophilus and Lactobacillus delbrueckii subsp. bulgaricus. When these bacteria are introduced to warm milk, they begin to break down the lactose (milk sugar) into simpler sugars like glucose and galactose. These sugars are then used as energy by the microbes, and the byproduct of this process is lactic acid. When enough lactic acid is produced, it causes the milk proteins to coagulate, creating the thick, creamy texture of yogurt.

In addition to the basic fermentation microbes, there are countless other microorganisms that can be used to create subtle variations in flavor, texture, and aroma in yogurt. While some of these microbes may even have potential health benefits, it’s important to note that not all yogurt cultures are considered probiotics.

The term “probiotic” can only be used to describe a microbe that has been shown to have a known health benefit, as defined by the World Health Organization. So, if you’re seeking out yogurt for its potential health benefits, be sure to check the ingredients list for specific probiotic strains.

Always check the heat when making yogurt

One of the key players in the process of making yogurt is heat. In fact, heat serves two important roles in the yogurt-making process. First, it sets the stage for proper fermentation to occur. Second, it provides the optimal temperature for fermentation to take place.

Most yogurt recipes include a step in which the milk is heated to at least 180 degrees Fahrenheit and often held at that temperature for 10 minutes or more. At first glance, this step might cause concern for raw milk enthusiasts. However, there are good reasons why heating milk is an essential part of the process.

The heat helps remove unwanted microbes from milk, creating a clean slate for the yogurt microbes to thrive and produce the desired byproducts. Even more, the high heat denatures certain proteins in the milk, particularly whey proteins, which causes them to combine with the caseins to create a thicker, creamier texture.

The heat-induced denaturation of whey proteins is particularly noteworthy, as these proteins are typically not incorporated into the curd and are instead left in the whey. But with heating, they become an integral part of the curd, resulting in a thicker and more protein-dense yogurt. This effect can be further enhanced if the yogurt is strained, which removes even more of the whey and increases the protein content even further.

The incubation period, during which the yogurt is kept at a warm temperature until coagulation is complete and the desired flavor profile is achieved, is a crucial part of the process. The temperature for incubation should be maintained between 100- and 125-degrees Fahrenheit, with 110 degrees being the most common temperature used.

The length of incubation time can vary depending on the temperature, with higher temperatures resulting in a faster fermentation time. For example, at 125 degrees Fahrenheit, it might take only 4 hours, while at 100 degrees Fahrenheit, it might take 12 to 18 hours.

The refinements of flavor and texture can be fine-tuned by adjusting the preheating step, the incubation time, and the incubation temperature. However, if you’re making yogurt at home, don’t get too bogged down in the details. Remember, fermentation is a natural process that will happen on its own. All you need to do is provide a warm spot, wait patiently, taste test, and learn from the results.

Making your own

If you want to make your own yogurt easily at home, here are the ingredients you will need and the steps you need to follow:

  • 1/2 gallon of whole milk
  • 1/4 teaspoon of powdered yogurt culture

Note: If you don’t have powdered yogurt culture, you can use 1/4 cup of plain yogurt with live active cultures

Directions

  1. Pour the milk into a stainless-steel pot and heat it gently, occasionally stirring, until it boils. Remove it from the heat.
  2. Place the pot in a cool water bath in the sink and stir the milk until it cools down to 120-125 degrees Fahrenheit.
  3. In a separate bowl, mix the fresh yogurt with enough milk to create a thin, smooth liquid.
  4. Add the thinned yogurt to the warm milk and stir well. Alternatively, sprinkle the powdered culture on top of the milk, wait a few minutes, and then stir it in.
  5. Pour the mixture into two quart-sized jars and cover them tightly with lids.
  6. Line an insulated cooler with a towel and place the jars inside.
  7. Fill another quart jar with water that’s almost too hot to touch (around 150 degrees Fahrenheit), cover it, and add it to the cooler.
  8. Cover the jars with a towel and close the cooler lid. Place it in a warm spot. If it’s cold or you don’t have a warm spot, refill the hot water jar after about two hours.
  9. Wait for 8 hours and then check for thickness. The warm yogurt will be thinner than once it’s chilled, so look for a custard-like texture.
  10. Chill the jars in the refrigerator overnight.

Taste the yogurt the next day. If it’s not tart enough, incubate it longer next time or allow it to cool on the counter overnight before refrigerating it.

How long can you store homemade and commercial yogurt?

Yogurt has a long shelf life due to its acidic nature, whether store-bought or homemade. Strained yogurt lasts even longer. However, the count of beneficial bacteria decreases soon after production. If you want a high concentration of probiotics, it is best to consume it within a week.

The amount of active bacteria over time depends on the initial amount present in the yogurt and the availability of residual sugars for the bacteria to consume. If there are remaining sugars, fermentation will continue, even in the refrigerator, resulting in a sourer yogurt.

As a side note, I’ve eaten commercial yogurt a month past its expiration date, and it was perfectly fine. As long as it’s kept refrigerated, yogurt will last quite some time, and you shouldn’t hurry to throw it away. Do a taste test and decide if it’s still edible.

Buying quality yogurt requires a little bit of knowledge 

If you’re in the market for store-bought yogurt, be sure to read the label. Most yogurts contain added thickeners unless, of course, they have been drained. Some manufacturers now employ a technique to remove water from the milk before making it into yogurt, resulting in a thicker product.

Thickeners can include tapioca starch, non-fat milk powder, or guar gum. While these ingredients are not harmful, they do affect the taste of the yogurt. In addition to thickeners, there are many different cultures of microbes used in yogurt production. Even if two brands list the same microbes, the resulting yogurt can taste quite different. It’s a good idea to try several brands and see which one you like best.

One important consideration, especially for those watching their weight, is the amount of added sugar in yogurt. Even though lactose, a natural sugar in milk, is not very sweet, our bodies still recognize it as sugar. So, if you’re trying to reduce your sugar intake, avoid yogurts with added sugars.

To sweeten your yogurt, try adding low-glycemic fruits like berries or flavorings like vanilla or cinnamon. Lactose-free yogurt can also be a good option, as it will taste sweeter due to the breakdown of lactose into simpler sugars like glucose and galactose.

Thursday, June 8, 2023

How To Build An Electricity Free Fridge


One of the most immediate problems that we will face during a grid-down scenario is that the loss of electricity brings with it a failure of our ability to keep food from spoiling.

Generators, battery banks, and other off-grid power options can keep a refrigerator running but will rapidly consume valuable resources in the form of fuel and battery capacity.

Constructing an electricity-free refrigeration option will aid in preserving our battery and fuel stores.

Refrigeration Before Electricity

The electric refrigerator is a relatively modern innovation, and commercially available models have only been in homes for about a century.

Before that, the simple icebox was the most common method of keeping food cold, and even during ancient times, people used ice houses to preserve food.

The problem with using ice is that it may be hard to come by in a grid-down scenario, which is where evaporative cooling comes into play.

Evaporative cooling has proven to be an effective method of keeping perishable foods from spoiling throughout history in areas where ice is not readily available.

The two elements required for an evaporative cooler are wind and water, which are far easier to obtain than large quantities of ice or snow.

Zeer Pots

The Zeer pot has been in use for thousands of years in one form or another but was resurrected from history by Mohamed Bah Abba in the 1990s.

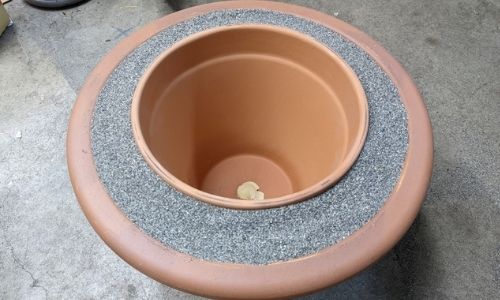
Abba developed the pot in pot refrigeration system, using two unglazed clay pots. These pots are different sizes; the smaller one should fit inside the larger one leaving a gap of about an inch or so.

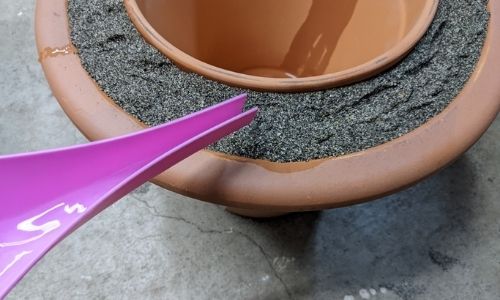
The inner pot is where the food you want to keep cold goes, and the outer pot serves to contain the sand that will fill the gap between the pots.

How the Zeer Pot Works

The Zeer pot can keep the inner pot cool because of the process of evaporative cooling.

For water to evaporate, it needs to absorb heat to turn the liquid water into vapour. As the water vapour absorbs this heat, it will be replaced by cool air that will settle in the inner pot.

The reason why the pots that make up a Zeer pot must be unglazed is to allow moisture to seep through the walls, which has a similar effect that sweating has on humans. Likewise, the moist cloth that is draped over the Zeer pot also aids in the cooling process.

Much like how a breeze can help cool your body when your clothes are damp or when you are sweating, the wind blowing across the Zeer pot is an essential component of its ability to keep food cold.

How to Build a Zeer Pot

Constructing a Zeer pot is a very simple process and requires readily available materials at your local hardware store. The entire build process takes very little time to complete. In my case, I constructed a Zeer pot in less than twenty minutes.

Materials and Instructions

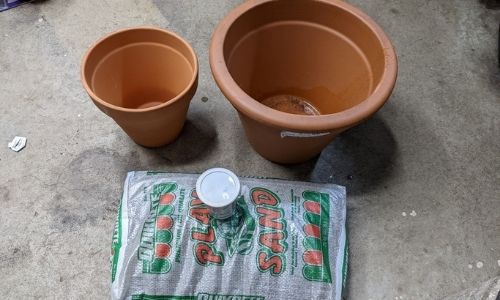
  • One large unglazed terracotta pot
  • One smaller unglazed terracotta pot
  • Sand

How To Build An Electricity Free Fridge

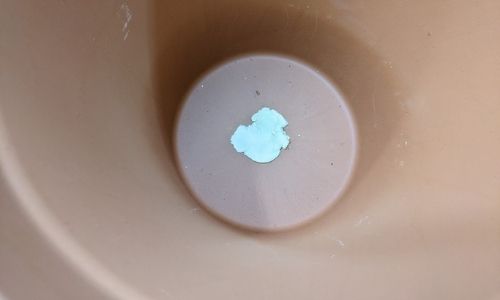
1. If there are drainage holes in the bottom of either of the pots, you will need to seal them.

In my case, I decided to use plumbers’ putty, but you can use anything you have on hand to keep the sand and water from leaking out of the bottom. Of course, whatever you decide to use needs to be waterproof.How To Build An Electricity Free Fridge

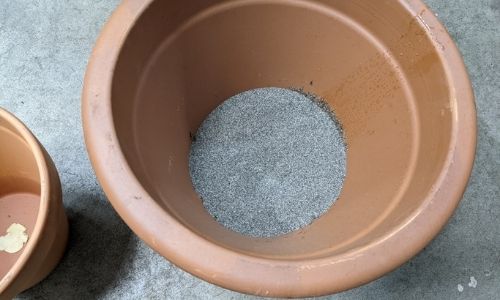
2. Pour a layer of sand into the bottom of the larger pot.

The goal is that when you place the smaller pot inside, the tops of both the pots will be at the same level or that the inner pot is slightly higher than the outer pot.How To Build An Electricity Free Fridge

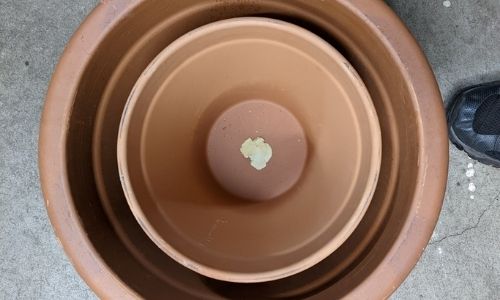
3. Place the smaller pot inside of the larger one.

Centre the pots as best you can and make sure the inner pot is not below the level of the outer pot, as this will mean that sand may fall into the inner pot.How To Build An Electricity Free Fridge

4. Pour sand in the gap between the pots filling it to the top.How To Build An Electricity Free Fridge

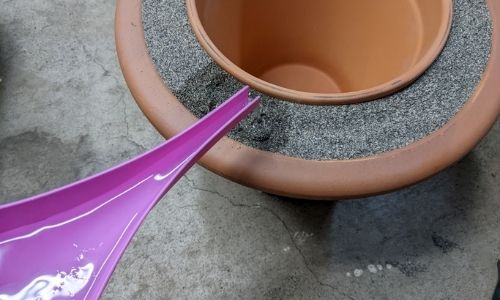
5. Pour water on the sand until the sand is saturated with water.

You will need to allow the pot to cool for a while before loading it with food. During this cool-down period, you will want to drape a damp cloth over the pots.How To Build An Electricity Free Fridge

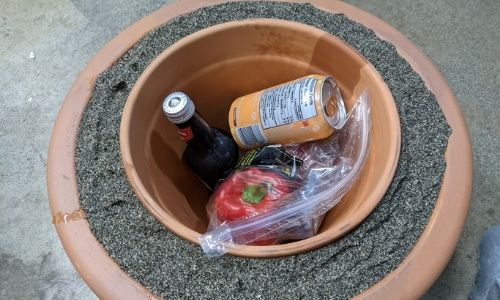
6. Fill the inner pot with whichever food you wish to keep cold.zeer pot

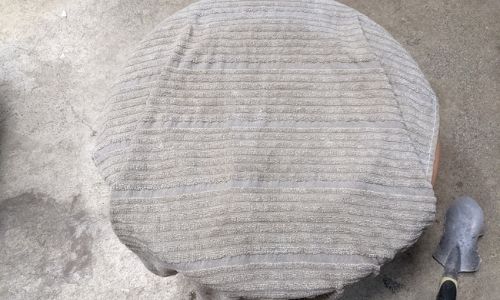
7. Cover your new Zeer pot with a damp cloth or lid.

It is essential that the fabric stay moist to facilitate the cooling effect. Then place the pot where it will be exposed to the wind and remain out of direct sunlight.zeer pot

8. Pour water on the sand a couple of times a day to prevent it from drying out.How To Build An Electricity Free Fridge

Limitations of the Zeer Pot

There are several limiting factors for this style of electricity-free refrigeration:

  • The Zeer pot is best suited for use in dryer climates. As the humidity in the air increases, the effectiveness of the Zeer pot is decreased.
  • You have to keep the wet sand and damp cloth moist for the Zeer pot to maintain effectiveness. This means that you may have to wet the sand several times a day.
  • Evaporative cooling requires wind, so in areas where there is no breeze, the Zeer pot will not be nearly as effective.
  • There is no way to ensure that the temperature remains stable throughout the day, meaning that there could be periods of time in which the temperature within the Zeer pot rises to unsafe levels.
  • Direct sunlight cancels the cooling effects.

If you live in a hot, dry region, the Zeer pot is a fantastic option for extending the lifespan of fresh produce without expending precious resources to generate the electricity required for conventional refrigeration. It is cheap, effective, and genuinely off-grid.

In this short VIDEO, I will unearth A lost super-food will bulletproof you against any food shortage or famine. It’s a food that vanished with the Incas over 6 centuries ago

In the next crisis these lost skills will be more valuable than gold, food supplies and survival equipment combined. These skills have been tested and proven to work for centuries.

Here is just a small glimpse of what you’ll find in this massive 300-page sequel (in color) 

  • A lost super-food will bulletproof you against any food shortage or famine. It’s a food that vanished with the Incas over 6 centuries ago. This mysterious dish was just recently rediscovered by NASA who has been giving away rations of it to our brave men and women in their month-long space missions. The Incas stored it in pit holes for up to 10 years, ate it year-round, and actually used it to survive a 4 year long super-drought that wiped out their southern neighbors. So, if it managed to save the Incas centuries ago and it still works for our astronauts today, you can bet your last dollar it will keep you and your family well fed in any crisis. And the best part is that you probably already have the ingredients in your kitchen right now.

Wednesday, June 7, 2023

16 Survival Tips From The 1900s That Are Still Brilliant Today


Survival tips and hacks have been around for centuries, and, in most cases, are mere fragments of information passed down through generations.

And whether we're solving problems in the home, or problems concerning health, we all want to be prepared at all times, and to have a list of tried-and-true tricks ready in our heads.

The New York Public Library has an incredible digital collection of antique materials and prints, featuring artifacts like photographs, manuscripts, and maps.

But below, we share with you one of its most amazing archives  a list of ingenious life hacks that have survived from the 1900s, once supplied in cigarette packs!

These life tips were once printed on "cigarette cards," which were once found inside cigarette packs. Customers could collect and trade these unique and interesting little cards — and now, they've been digitized for our enjoyment!

Scroll further to go through the incredible lost survival hacks from the 1900s, and let us know your thoughts in the comments below!

How-To-Remove-a-Tight-Ring-from-the-Finger1
New York Public Library Digital Collections

1. How To Remove A Tight Ring

"To remove a tight ring from the finger without pain or trouble, the finger should be first well-lathered with soap.

"It will then be found that, unless the joints are swollen, the ring can easily be taken off.

"If, however, the finger and joints are much swollen, a visit to the jeweller is advisable."

How-To-Detect-Escaping-Gas1
New York Public Library Digital Collections

2. How To Detect Escaping Gas

"There is always a danger in trying to locate an escape of gas with a light. The method shown in the picture, however, is free from risk and quite reliable.

"Paint strong soap solution on the suspected length of pipe and the gas will then cause bubbles at the escaping point, which can be dealt with at once."

How-To-Measure-With-Coins1
New York Public Library Digital Collections

3. How To Measure With Coins

"It is sometimes useful to know that half-a-crown equals half an ounce in weight, and three pennies weigh one ounce.

"A half-penny measures one inch in diameter; half-crown an inch and a quarter, and a sixpence three-quarters of an inch in diameter."

How-To-Pick-Up-Broken-Glass1
New York Public Library Digital Collections

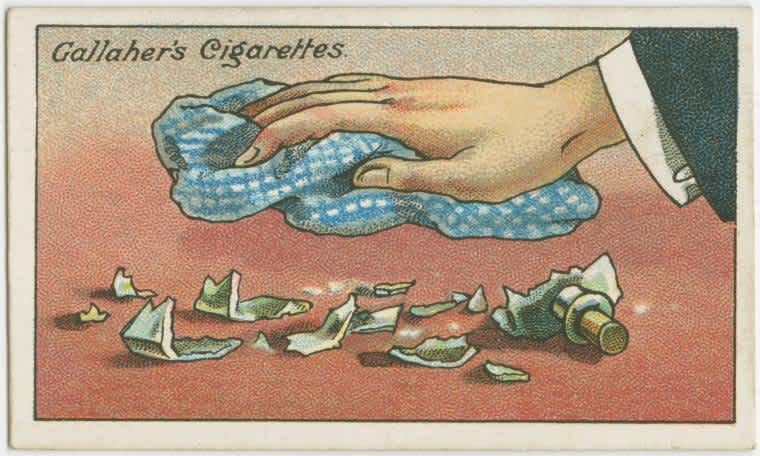
4. How To Pick Up Broken Glass

"To pick up broken glass quickly and cleanly, a soft damp cloth will be found to be most effective, for it takes up all the small splinters.

"The best plan is to use an old piece of rag that can be thrown away with the glass."

How-To-Preserve-Valuable-Vases1
New York Public Library Digital Collections

5. How To Preserve Valuable Vases

"If the following precaution is taken, the danger of knocking over a valuable vase will not be so great.

"Partly fill the vase with sand, which, acting as a weight, keeps it upright and firm on its base.

"This idea is particularly useful in the case of vases which are inclined to be top-heavy, owing to their having small bases."

index
index
New York Public Library Digital Collections

6. How To Extract A Splinter

"A splinter embedded in the hand is often very painful to extract.

"A good way to accomplish this is to fill a wide-mouthed bottle with hot water nearly to the brim, and press affected part of hand tightly against mouth of bottle.

"The suction will pull down the flesh, and steam will soon draw out the splinter."

How-To-Judge-the-Freshness-of-a-Lobster1
New York Public Library Digital Collections

7. How To Judge The Freshness Of A Lobster

"If, when buying a boiled lobster, you are in doubt as to its freshness, just pull back the tail, then suddenly release it; if the tail flies back with a snap, the lobster is quite fresh: but if it goes back slowly, you may be pretty sure the lobster has been boiled and kept for some days."

How-To-Keep-a-Paint-Brush-Handle-Clean1
New York Public Library Digital Collections

8. How To Keep A Paint Brush Handle Clean

"To do away with the annoyance of a wet and sticky brush handle, which is so unpleasant to the amateur painter, get a piece of card or tin and make a hole in it through which the handle can be forced, as shown in the picture.

"This prevents the paint from running down."

How-To-Detect-Dampness-in-Beds1
New York Public Library Digital Collections

9. How To Detect Dampness In Beds

"In order to detect dampness in a strange bed and so be warned of the danger, a small hand mirror should be slipped between the sheets and left for a few minutes.

"Any mistiness or blurred appearance of the mirror's surface when withdrawn is an indication of dampness, and the bed should not be slept in."

How-To-Cool-Wine-with-Ice1
New York Public Library Digital Collections

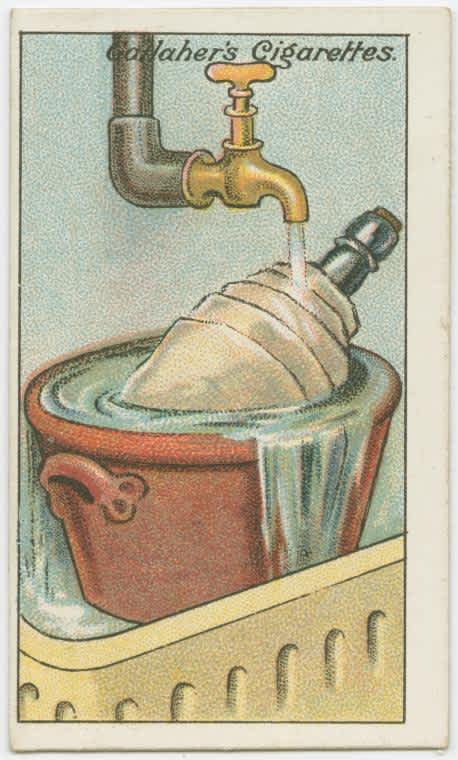
10. How To Cool Wine Without Ice

"If no ice is available for cooling wine, a good method is to wrap the bottle in flannel and place it in a crock beneath the cold water tap.

"Allow the water to run over it, as shown in the picture, and in about 10 minutes the wine will be thoroughly cool and ready for the table."

Bread
Bread
New York Public Library Digital Collections

11. How To Cut New Bread Into Thin Slices

"The difficulty of cutting new bread into thin slices can readily be overcome by the following expedient.

"Plunge the bread knife into hot water and when thoroughly hot wipe quickly.

"It will be found that the heated knife will cut soft, yielding new bread into the thinnest slices."

index copy 9
index copy 9
New York Public Library Digital Collections

12. How To Make A Fire Extinguisher

"Dissolve one pound of salt and half a pound of sal-ammoniac in two quarts of water and bottle the liquor in thin glass bottles holding about a quart each.

"Should a fire break out, dash one or more of the bottles into the flames, and any serious outbreak will probably be averted."

How-To-Clean-New-Boots1
New York Public Library Digital Collections

13. How To Clean New Boots

"New boots are sometimes very difficult to polish.

"A successful method is to rub the boots over with half a lemon, allow them to dry, after which they will easily polish, although occasionally it may be found necessary to repeat the application of the lemon juice."

How-To-Pull-Out-Long-Nails1
New York Public Library Digital Collections

14. How To Pull Out Long Nails

"It is often rather difficult to pull out a long nail from wood into which it has been driven, for when drawn out a short distance as in A, there is no purchase from which to pull it further.

"If, however, a small clock of wood be placed under the pincers, as in B, the nail can be pulled right out without difficulty."

How-To-Carry-a-Heavy-Jug1
New York Public Library Digital Collections

15. How To Carry A Heavy Jug

"The picture gives a useful hint on carrying a heavy jug.

"The correct way to hold the jug is shown in the right-hand sketch. This prevents the weight from pulling the jug down and so spilling what it contains, as is likely to happen if carried the other way."

index copy 2
index copy 2
New York Public Library Digital Collections

16. How To Light A Match In The Wind

"The familiar difficulty of lighting a match in a wind can be to a great extent overcome if thin shavings are first cut on the match towards its striking end, as shown in the picture.

"On lighting the match, the curled strips catch fire at once; the flame is stronger, and has a better chance."

THE STAGE IS BEING SET FOR CHAOS ON A SCALE THAT MOST AMERICANS NEVER EVEN DREAMED WOULD BE POSSIBLE: 12 STUNNING EXAMPLES OF HOW FAR AMERICA HAS FALLEN

( OPINION ) When I was young, I often wondered what it must have been like to live during the fall of the Roman Empire. Unfortunately, now I...